

In this 2025 guide to insulating shipping containers in Australia, we’ll break down the best materials, real-world costs, climate tweaks and council rules for you in.
Your shipping container modification plans need to incorporate proper insulation. Without it, the usability of your otherwise hardy unit will diminish substantially. And, in short time, mould and corrosion will cause your investment to lose its value.
Shipping containers are like giant steel radiators in summer — hot enough to fry eggs. And in winter, these containers will be cold enough to store ice.
Proper insulation will transform these simple metal boxes into comfortable, energy-smart workspaces or storage spaces. It’s the crucial step you need to preventing condensation from rusting your shipping container out.
Why insulating shipping containers is non-negotiable in Australia
Our climate extremes in Australia swing from 45 °C desert heat to alpine frost. Insulation is crucial for comfort and energy efficiency. The temperature outside can transfer almost instantly due to the bare steel construction of a shipping container.
In Australia’s summer heat, warm moist air will condense on the inside of the walls, leading to mould and corrosion that shorten the life of the shipping container. The best way to stop the rust is a seamless vapour seal.
Code, condensation & maintenance
In cases where people will live or work inside a structure, most Australian councils insist on minimum NCC R-values and group fire ratings (fire hazard classification of materials used in internal linings in buildings). With any structural changes, ask for factory-issued engineer’s certificates.
Schedule an annual inspection: run a moisture meter behind access hatches and check roof panels for rust or loose tape.
Early fixes cost pocket change; ignored leaks can cost a new container.
5 steps to install insulation
- Surface prep
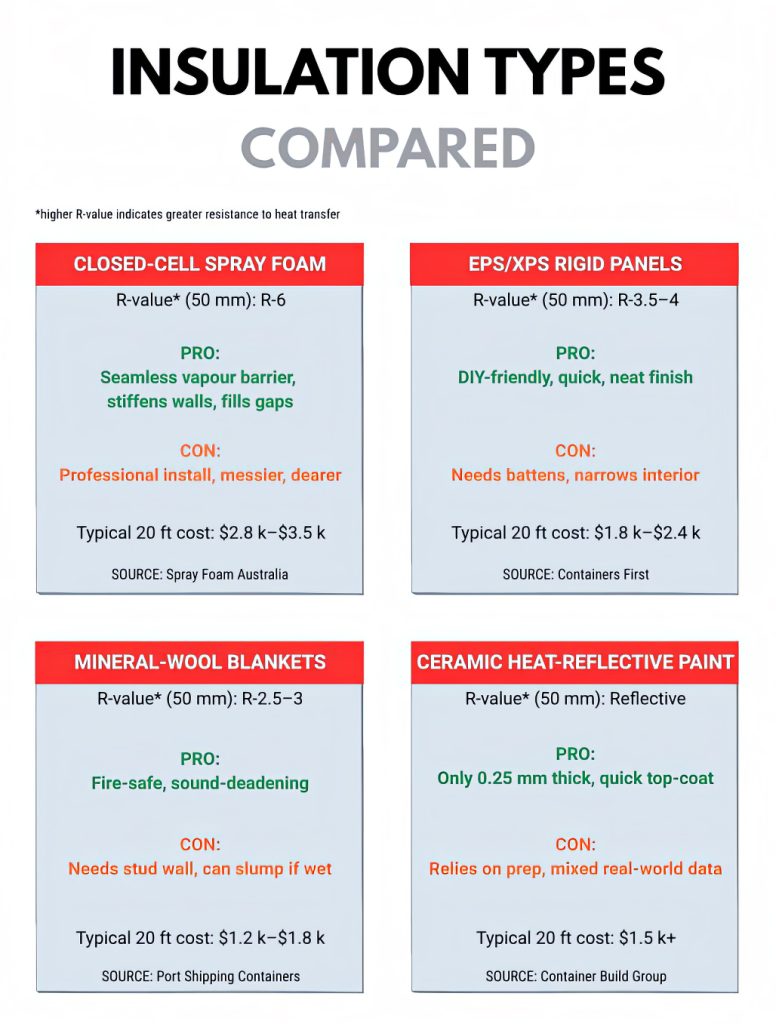
Pressure-wash, remove rust, seal pin-holes with marine epoxy. - Frame-out (for panels/blankets)
Fix 25–50 mm timber or steel battens to walls, ceiling and floor. - Install insulation
Evenly spray foam or friction-fit panel pieces, taping all joins airtight. - Add a vapour barrier
Use foil-backed wrap in humid zones to stop moist air reaching steel. - Line it out
9 mm ply or fibre-cement boards will resist knocks better than plasterboard.
These options meet NCC (National Construction Code) fire rules.
Climate-smart tweaks
- Tropics & coastal north
Light-coloured exterior paint and a simple shade roof can drop internal temps up to 10 °C. - Desert interiors
Pair spray foam with solar-powered extraction fans to purge trapped heat each afternoon. - Alpine regions
Boost floor R-value to 4 + and add thermal-break cladding outside to stop cold bridging.
Budget & pay-back snapshot
Insulation will add roughly 15–30% to the cost of a basic container fit-out. But it can cut heating or cooling bills by 30–50%.
A foam-insulated 20 ft office, tested at a Darwin site, used 43% less air-con energy than an uninsulated twin — paying for itself in just under 3 wet seasons.
Wrap-up
Choose insulation that suits your climate, budget and skill level, then install it airtight. Do it once and do it right. A converted container completed in this way will feel like a regular room without the bricks-and-mortar price tag.
At Gatehouse Containers, we can integrate insulation during fabrication so your unit arrives climate and council ready.


